

Can you believe Christmas is less than a week away?? We’re looking forward to spending the holidays with our loved ones!

As we’ve started to gather our gifts underneath the tree and make a whole sheet of iced Christmas cookies, we’ve got a few extra ways to make your holiday special with four Disney-themed crafts!
You can follow along with these tutorials to add some magic to your decorations during the holiday season.
Princess Tiana Christmas Wreath
You can add some flair to your home with DIY items themed after your favorite characters. And, you can channel your inner Disney Princess as your family teams up to make the Tiana Christmas Wreath!
Materials:
- Plain Wreath
- Mesh ribbon in purple & green
- Ornaments & pick sticks
- Princess Tiana doll
- Spray Mod Podge
- Glitter (optional)
- Gold wire
- Scissors
Instructions:
- Once you’ve laid out all the materials, you’ll need to cut any strings off the ornaments. Set a few of the ornaments aside that you want to add glitter to. Then, spray them with Mod Podge, sprinkle with glitter over a paper plate, and set them to the side to dry.
- Flip the wreath over and feed the mesh ribbon one color at a time through the back of the wreath. You’ll be creating loops of ribbon that will show from the front of the wreath.
- Once you’ve put both colors of ribbon on the wreath, you can start placing ornaments around it. Use the gold wire to wrap the ornaments onto the wreath, then use the same wire to secure the Tiana doll to your desired position on it as well.
- Continue to place ornaments and pick sticks around it, as well as a picture of Prince Naveen as a frog to add to the wreath!

Although you can follow along with the necessary materials, you can also incorporate your own Tiana-inspired items on the wreath to make it unique!
See more details about how to make the Princess Tiana Christmas Wreath!
Gingerbread Mickey Ornament
But, you don’t have to stop at making wreaths! You can also design your own sweet Gingerbread Mickey Ornaments to hang on your trees too!
Materials:
- Gingerbread Mickey Template
- 1 – 9×12 sheet of brown felt
- 1 – 9×12 sheet of black felt
- 1 – yard of white yarn ribbon
- Puffy paint (white, green, and red)
- Polyfill
- Big eye needle
- Scissors
- Marker
- Glue gun

Instructions:
- Use your marker to trace two Gingerbread Mickeys on your stencil on the brown felt.
- Carefully cut out each of your Gingerbread Mickeys. Place the Gingerbread Mickey interior stencil one of your Gingerbread men and trace around the outline with white puffy paint.
- Add some paint squiggles on the arms and legs and let them dry.
- Once the Gingerbread Mickey is dry, place it on top of the second Gingerbread Mickey
- Use your needle and white yarn to carefully sew the two pieces together with a whipstitch.
- Before you completely stitch up your Gingerbread Mickey, stuff it with polyfill.
- Then, use your Mickey face stencil to trace Mickey’s face onto the black felt, cut the pieces out, and glue the eyes, nose, and mouth onto the ornament.
- Afterward, decorate the rest of the ornament with puffy paint, ribbons, buttons, rosy cheeks, and bows.
- Then, hot glue a looped ribbon onto the back of the Gingerbread Mickey to hang it onto your Christmas Tree!

We highly recommend making your own gingerbread cookies at home to snack on while you start bringing your ornaments to life!
Check out the details on the Gingerbread Mickey Ornament!
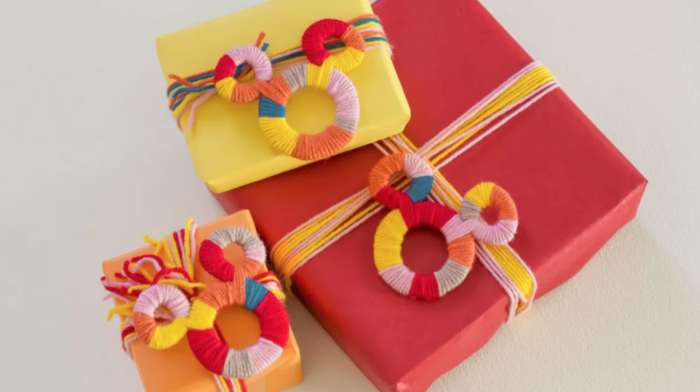
Mickey Yarn Present Topper
Although you can use bows or tags to decorate your gifts, you can add a bit of Disney flair to your presents this year! Here’s what you’ll need:
Materials:
- Yarn in various colors
- Cardboard
- Scissors
- Craft knife
- Pen
- Hot glue
Instructions:
- Cut out the Mickey template and use it to trace onto the cardboard. Repeat for as many tags as you need.
- Use your pen to draw circles on the inside of Mickey’s head and each ear.
- You may need to use a craft knife to cut out the inside circles if you aren’t able to get them with your scissors. Cut out these circles, then cut out the whole Mickey shape. If the edges are rough, they’ll be covered by yarn so you won’t see them!
- Choose your first color of yarn and cut a piece about 12 inches long. Designate one side of your Mickey shape as the back and one as the front.
- Glue one end of the yarn onto the back, then start wrapping! Glue the other end down when you get to the end and start a new color.
- Wrap up your gifts, then use yarn as ribbon.
- Thread the yarn through a loop in the back to attach the Mickey Toppers or glue it on top of the gift so they aren’t covered by the rest of the yarn.

And voila! You have an extra little gift on top of your Christmas present! After you use the Mickey Yarn Present Topper as a decoration on your gifts, you can hang it in your room or around your house for an extra pop of color.
Here’s a look at all the details on the Mickey Yarn Present Topper!
Disney Christmas Sweater
Disney has teamed up with the French fashion influencer Margot from YouMakeFashion to show everyone how to make their own Disney Christmas Sweater! And, you’ll only need a few supplies and decorations you’ll find around your home to make it without sewing or gluing.
After you’ve made sweaters at home for everyone in your family, you can pose in front of your Christmas tree for an extra special holiday photo!
Here’s how you can make your own DIY Disney Christmas Sweater!
We can’t wait to make all these items during our Christmas vacation! And, we’ll be sure to give you a look at the other ways you can celebrate the holidays at home soon!
Here’s a look at the BEST new foods we saw at Disney World this year!
What are you doing for Christmas this year? Let us know in the comments below!
Disney Entertainment
- The 4 Biggest Disney LEGO Sets You Can Get on Amazon Right Now
- In One Week a Disney World Restaurant Closes to Make Way for Some Major Changes
- REVIEW: This New DOLE Whip Flight in Disney Springs Makes Us Feel Like A Kid Again
- We’ve Got A HUGE Update About Disneyland’s Bats Day in 2027
- Why Disney Vacation Club Members Are Circling July 22nd on Their Calendars
- This NEW Experience Is Worth a Whole Trip to Orlando
- AllEars TV: Big Thunder Mountain Railroad Has CHANGED In Magic Kingdom
- This Disney World Park’s Wait Times Are About To TOTALLY Change
- It’s Official: These Are the 7 Weirdest Disney Cruise Line Rules
- The Rule Every Major Airline is BEGGING You NOT to Break


Trending Now
We found four of the BEST Harry Potter deals to shop on Amazon right now!
These amazing Stitch-themed souvenirs are all under $20!
Get our favorite shoes for up to 50% off!
Check out these new Stanley tumblers before they're GONE!
Amazon has 50 Loungefly bags up to 50% off!
Annual Passholders are some of Disney World’s most loyal fans. They are also, let’s be honest,...
You still have plenty of options when it comes to finding the PERFECT convertible Loungefly...
We're reminding you about this upcoming restaurant closure in Disney World.
BIG changes are coming to Universal Orlando.
New and old perks alike are returning to Disney World in 2027.
These 7 Loungefly bags are for Disney fans looking for a unique look!
We've compiled a list of every Disney Loungefly on sale in May!
Heads up! A new rule could be coming back to Disney Springs for Memorial Day...
These are the Loungeflys that everyone is going to be wearing in 2026 -- and...
The best Loungeflys for May.
The final touches are getting added to the Rock 'n' Rollercoaster Starring The Muppets!
We need these NEW Disney Loungeflys ASAP!
All the new perks available to Disney+ subscribers!
Here are seven new Disney Loungefly bags and accessories you can find right now at...
9 new Disney Loungeflys that you can order right now from Disney Princesses to your...