

We hope you’re hungry, because we’re back with another Disney recipe that you’re going to want to make ASAP!

And, this time, your whole family is going to adore this unique and creative dessert!
Disney Family has shared the sweetest recipe that will have you wanting to eat cupcakes for days (not that we already do). The Stitch & Angel Cupcake Cones channel the cuteness of our favorite aliens without all the chaos. Well, there might be some chaos when you’re making these treats! 😉
Ingredients
- 2 1/2 Cups crumbled cake (or a small 6″ cake)
- Frosting of choice (amount varies on the cake)
- Waffle cones
- White candy melts
- Vegetable or coconut oil (optional)
- Sprinkles Oil-based food coloring (blue, purple, black, pink)
- Mini candies
- Small paintbrush
- Marshmallows
- Piping bags
- Scissors

Directions
In a stand mixer (or by hand), crumb cake and begin adding frosting a little at a time. Scrape down the sides of the bowl to ensure an even mix. You are aiming for a cookie dough-like consistency, where the mixture pulls away from the bowl and forms a ball.

Roll mixture into cake balls, approximately 1 1/2″ wide, and place on a lined baking tray. Place in freezer for 15-20 minutes, or in the fridge for a couple of hours. Ensure the pops are not frozen when you dip, but are firm and cooled.

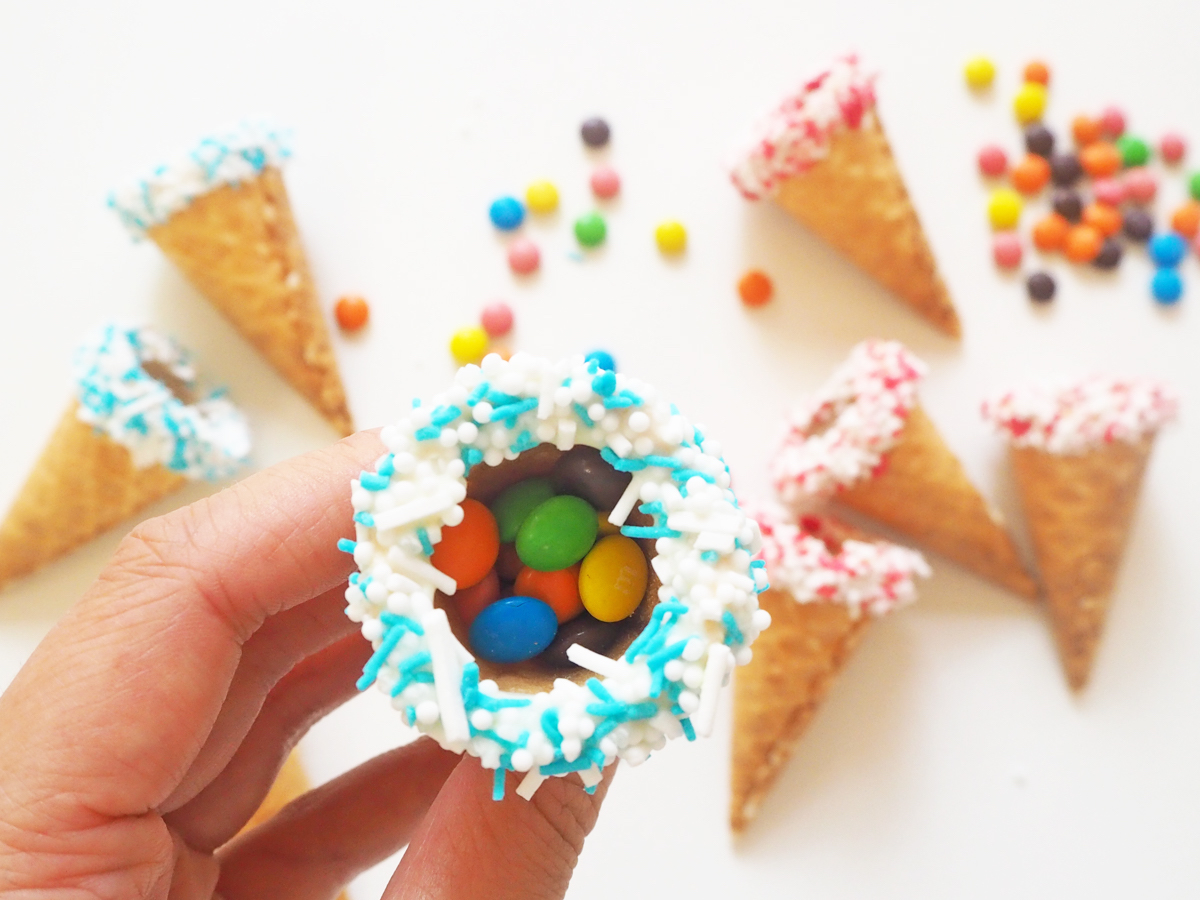
Cut your waffle cones with a serrated knife to 2 3/4″ in length. Melt white chocolate into a double boiler or in 30-second intervals in the microwave. Stir to ensure the heat is distributed evenly, to prevent lumps and the chocolate from burning. If the chocolate you use is too thick, you can thin it down by using a bit of coconut or vegetable oil. Then dip the cone edges into melted chocolate and sprinkles. Fill the cones with small candies as an extra little surprise.
To make Stitch: Melt candy melts the same way you melted the previous chocolate. Color the chocolate a light blue, then dip the bottom 1/3 of your chilled cake balls in the melted chocolate. Attach them to the cones, then stick 2 mini candies in place of the little Tsum Tsum hands. Place on a small ice cream cone holder to set. (Alternatively, you can create your own holder with egg cartons or cardboard boxes with small holes cut into them.)
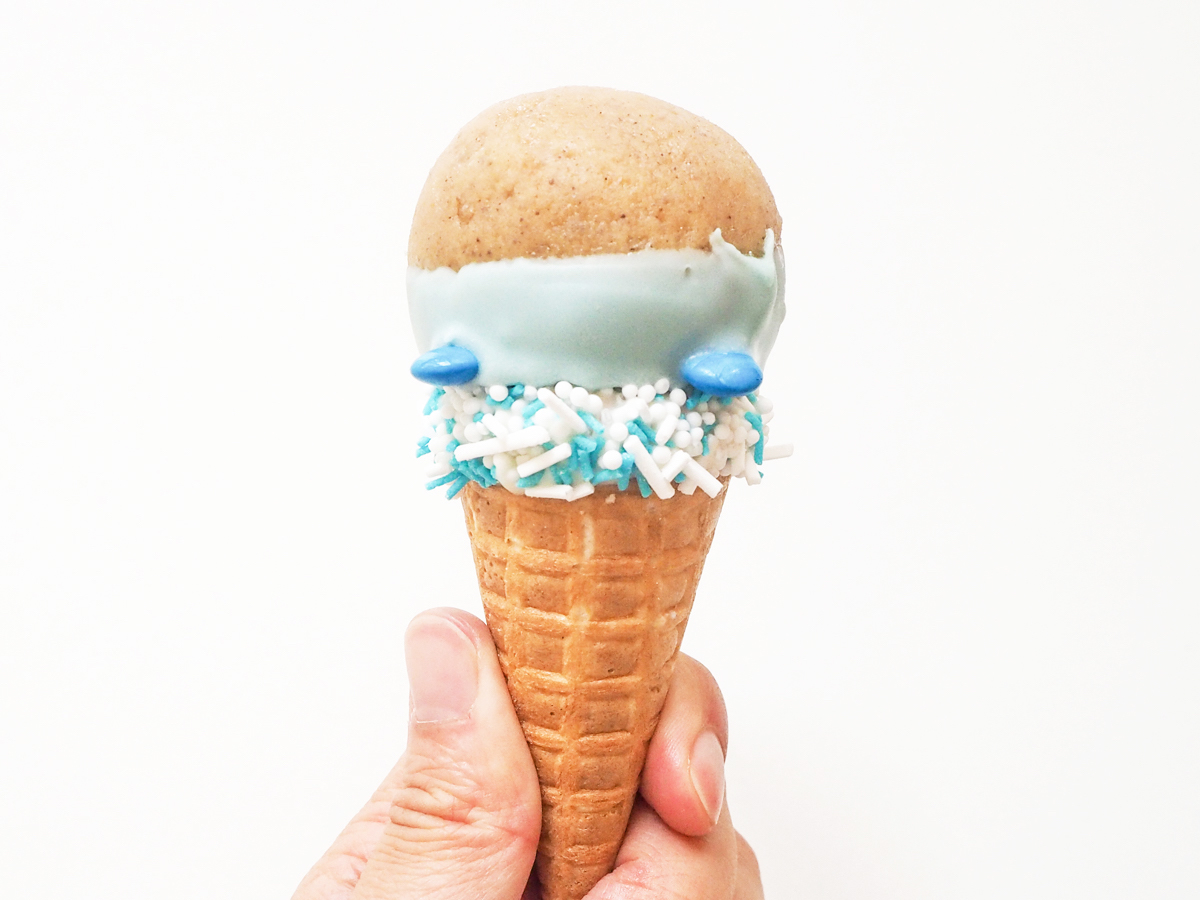
Dye the rest of the chocolate a darker blue. Dip the rest of the cake pop in, making sure it overlaps the first light blue layer, though not completely covering it. With a small paintbrush, paint the mini candy hands the same color.

Cut the ears out of the edges of marshmallows and stick them onto the cake pop with melted chocolate. When they have set, paint the back of the ears with the same blue chocolate. Dye chocolate purple, then paint the inner section of the ears.
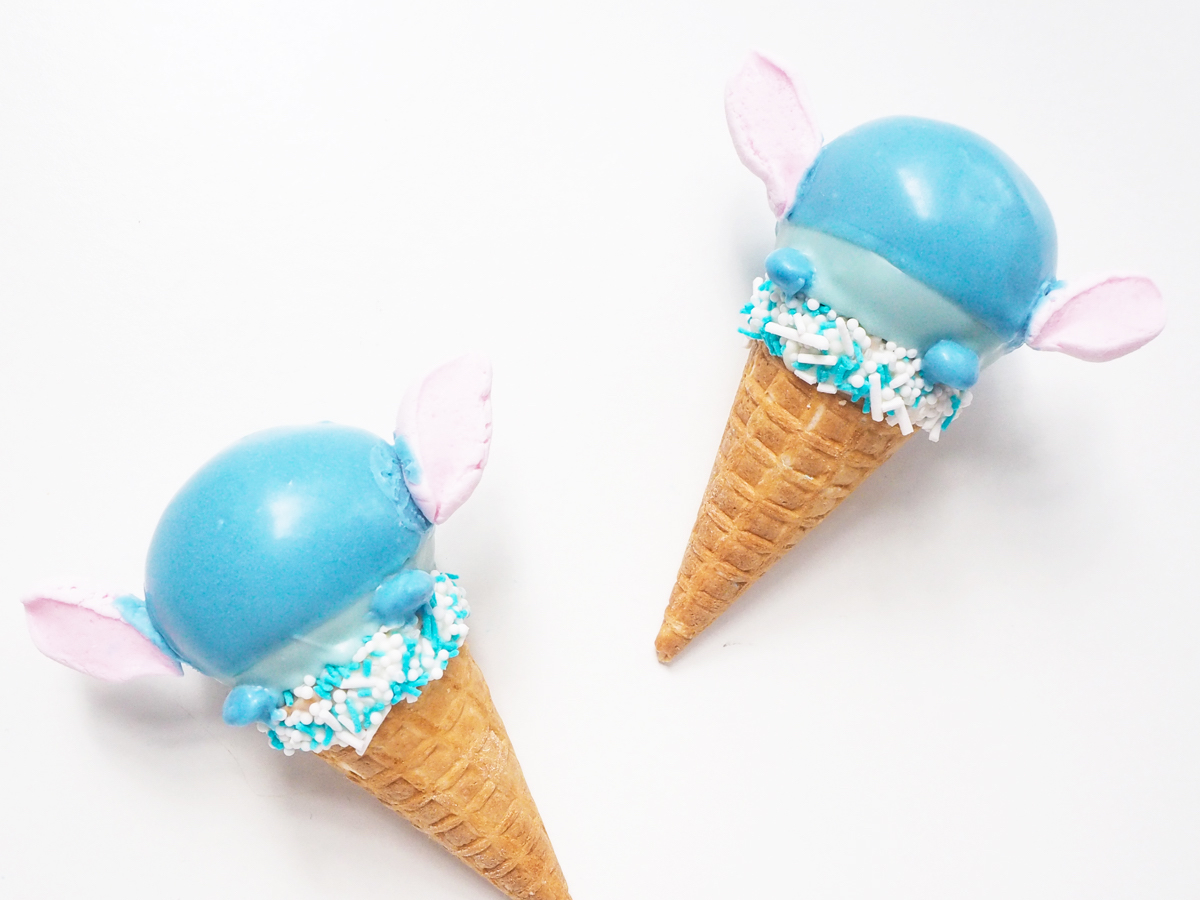
Melt chocolate, dye some dark and some light blue, add to piping bags, cut a hole in corner, and pipe dark blue for the nose and light blue for the eyes onto wax paper. Let dry. Use some of melted chocolate to add to face. Dye melts black and pipe on as eyes. For the Angel cake pops: do the same as above, but replace the blue chocolate with pink!

Aren’t these some of the cutest Disney treats you’ve ever seen?! We’ll be sure to keep an eye out for even MORE recipes you can make at home soon. Stay tuned with All Ears for the Disney news you need to know!
Take in the relaxing sounds of Blizzard Beach from your home while you bake!
Will you be making these cupcake cones at home? Let us know in the comments below!
Disney Entertainment
- Disney World’s Annual Music Festival Is BACK! See the FULL LINEUP of Performers
- 10 Experiences Are LEAVING Disney World Next Month
- Exclusive Livestream Announced for Destination D23
- FULL LIST of Exclusive Mickey’s Not-So-Scary Halloween Party Meet-and-Greets in Magic Kingdom
- Date Revealed for the Official Release Date of ‘Thunderbolts*’ on Disney+
- Your Jaw Will DROP at These 2 NEW Shows at EPCOT
- NEWS: Disney+ Just Announced TWO New Shows – Including a ‘Cars’ Series!
- UPDATE on Bob Iger’s Number One Priority
- The #1 Unreleased Show in the Disney Vault I NEED to See!
- Disney Files NEW Permit, Likely for Upcoming ‘Zootopia’ Show


Trending Now
We found the perfect bags for Magic Kingdom as we enter spooky season!
A pool closure is happening soon at Disney's Animal Kingdom Lodge!
There's a new limited time cake slice at The Cake Bake Shop that we think...
Thinking about applying for TSA PreCheck? Make sure to keep these four things in mind.
Let's find out what you said were the things that no one could pay you...
Act fast to get this bag in time for fall!
Hurry to Amazon to get your next pair of Hokas!
The biggest sign that EPCOT's Food and Wine festival is on its way just arrived...
These 3 new shoes on Amazon are perfect for your grandma's trip to Disney World.
There are two new 'Winnie the Pooh' Lub bag arrivals at the Disney Store!
We tried 14 limited-time Disneyland snacks and we're bringing you with us!
Listen, we've gotta be honest -- these two snacks were NOT IT in Disney World...
Flying with Allegiant Air soon? Check out these super important unspoken rules!
There are a couple of Priceline deals on Disney World hotels in October.
I have to admit, everyone hated this Disney World restaurant, but it was my favorite!
Sorry we're late, I was throwing a FIT over the latest results of a poll...
We recently stopped by Pizza al Taglio at EPCOT and are bringing you our FULL review!
Here's a list of things you should NOT do on Disney's Skyliner.
This one item has made our park days so much better at Disney since we...
This is the new hotel room that Disney fans are calling "Bougie, Beautiful, and a...