


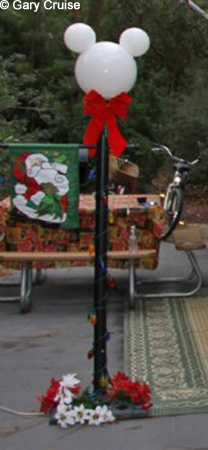
Have you ever visited Disney’s Fort Wilderness Resort and Campground and admired those wonderful lamp posts with the Mickey Mouse ears?
Me too!
Many of the campers at Fort Wilderness proudly display them at their campsites.
When I first saw one I was so taken with it that I asked the camper, “Where do you buy them?” I was disappointed when he replied, “You can’t buy them; you have to make them.”
But my wife Carol was determined to have one so she did a bit of online exploring and soon found a rudimentary parts list. I assembled the parts and started to build one. I was surprised at how easy it was!
That first one turned out quite well, so well in fact that several friends wanted me to make them one too. By the time I had made a few dozen lamps I had refined my technique.
Here are some instructions which you can use to make your own. Keep in mind I am not a certified electrician and am simply offering the “how to” that worked for me. Your mileage may vary; use caution, always, when building electrical lamps. Seek professional advice as needed.
After all, no true Disney fan should be without one! All of your friends and neighbors already think that you’re a crazy Disney nut . . . why not prove it to them by building one of these beauties!
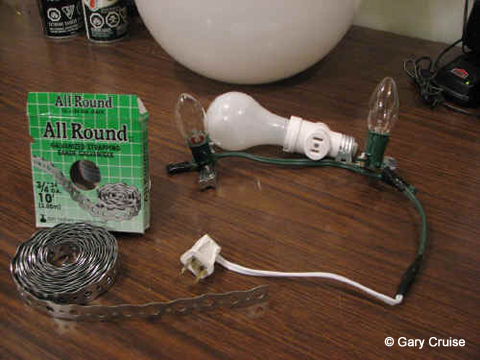
All the parts you need are available at Home Depot. If your local store doesn’t carry all the parts you can easily order them online.
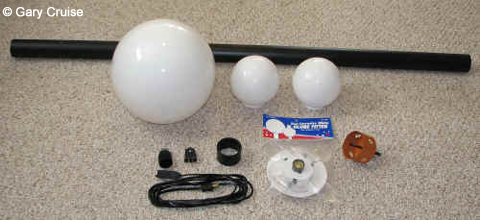
The parts to build a complete lamp (including the base and smaller lights to illuminate the ears) will cost you about $150.00 – $160.00
The lamps are weatherproof; we have had one on our backyard patio, fully exposed to the elements, for about 6 years. It has endured summer sun, heat and humidity as well as Canadian winter winds, ice and snow and it continues to shine brightly every night!
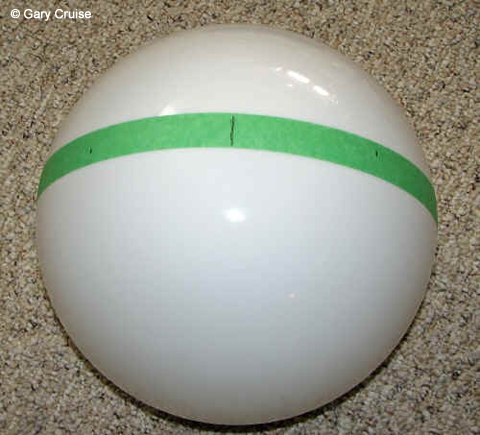
Step 1: Build Mickey’s head
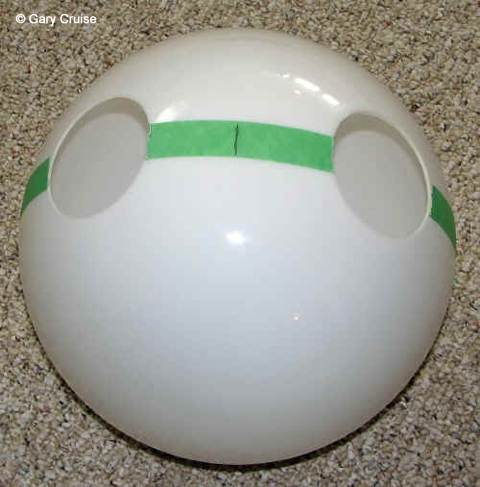
To do this you simply drill two 3 ¼ inch holes in the 12 inch globe and glue the 6 inch globes into these holes. Begin with the 12 inch globe. Apply masking tape across the top of the globe along the center line in order to mark the centers for the holes needed to mount the smaller globes. Draw a line at the “top dead center” of the lamp and then measure down 4 inches on each side and make another mark. This will mark the centers for each ear hole; the centers should be 8 inches apart.
Drill a small lead hole for each ear and then use your electric drill and a 3 ¼ inch hole saw to cut the ear holes. (If you don’t have a 3 ¼” hole saw you can buy one [$15.97 at Home Depot] and the arbor needed to attach it to your electric drill. Any employee at Home Depot can find these tools for you.)
When you use the hole saw, keep it flat to the surface of the globe and keep it moving at all times. If you stop the saw in the middle of the cut it may jam and crack the globe. Use light pressure, don’t press too hard.
I have found that the hole saw melts it’s way through as much as it cuts it’s way through. Just rub around the edges with a file or sandpaper to remove any beads of melted acrylic and you’re ready to glue!
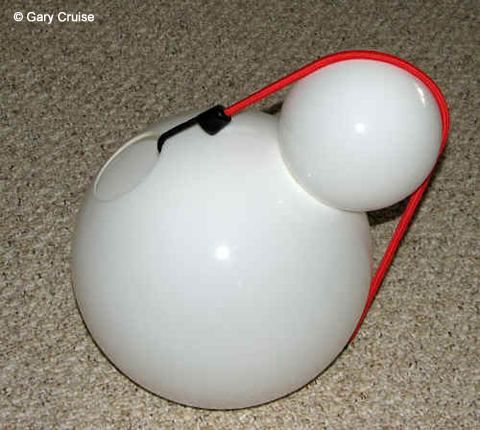
Remove the tape and glue the smaller globes into these holes, clamp until the glue is set.
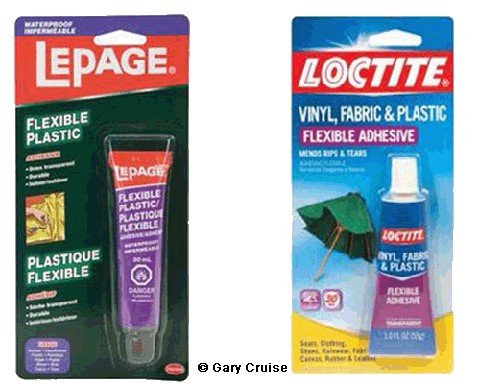
I use LePage’s Flexible Plastic adhesive which is sold in Home Depot in Canada. In the USA look for Loctite, it’s the same product.
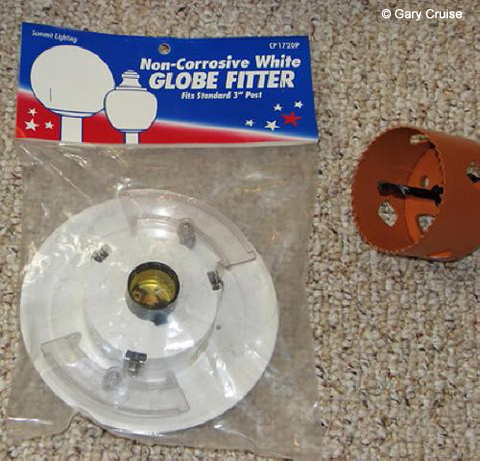
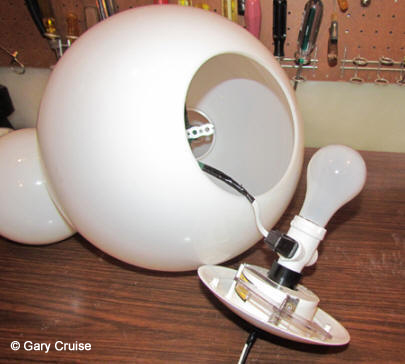
The Globe Fitter attaches to the bottom of the 12” globe and holds the light bulb. It is designed to clamp onto a standard 3 inch metal lamp post also sold at Home Depot.
Step 2: Illuminate the Ears
After building my first few lamps I decided to add smaller bulbs to illuminate the ears as well as the larger globe.
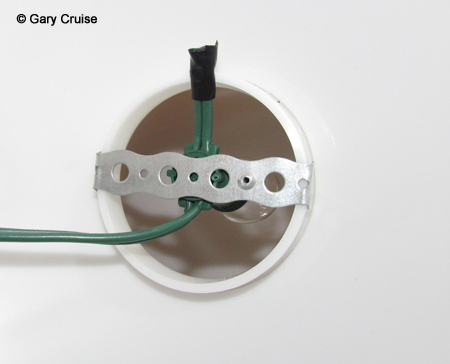
Begin with a piece of metal strapping, about 4 inches long. Bend about ¼ inch on each end so that the ends will create a “friction grip” on the flange of the 6” globe. That flange is now visible inside the 12” globe.
Make 2 of these pieces, one for each of Mickey’s ears.
Cut a length of outdoor Christmas lights so that you have 2 socket and enough cord on one end to attach a plug. Use pop-rivets or hot glue or tape to attach each socket to one of the metal straps you just made. Attach a plug which will plug into the new white socket (pictured below) inside the globe.
Here is a detailed look at the light socket riveted to the strap.
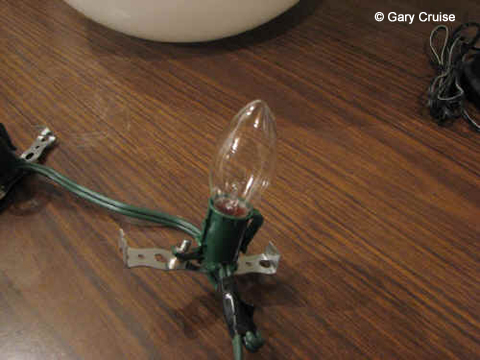
Note the 90 degree bends in the ends of the strap which provide that “friction grip” on the flanges of Mickey’s ears, inside the larger globe. Bend them to provide a snug fit and just press them on.
Step 3: Attach Mickey’s head to a lamp post
You can order a 3 inch lamp post online from Home Depot (search #501817) for $58.90 but your local store probably carries them, along with the mounting bracket (search #502211) for $14.36.
If you are going to permanently mount your lamp on a patio or deck, these items are what you need. The globe fitter was designed to clamp directly onto that 3″ post. Just wire it up, install it on your patio or deck and you are all done!
Congratulations, you have just built a Mickey Lamp — don’t you feel proud?
Step 4: Need a portable lamp?
If you are like me, and prefer to have your lamp more portable, the rest of these instructions are for you!
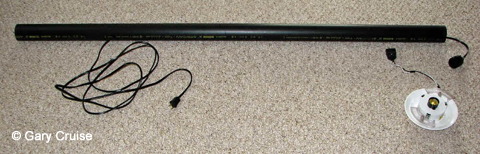
I need to have one that comes apart easily to store in the hatches underneath our RV. I use standard 2 inch ABS pipe for the post but PVC pipe is very similar and works well too. ABS or PVC is the pipe used by plumbers for household drains and it’s available in any building products store. It’s light, easy to work with and it doesn’t rattle in the RV. You need one piece of 2” ABS pipe about 5 feet long and one coupler (that is the piece plumbers us to glue two pieces of ABS pipe together). NOTE: You do not need any glue!
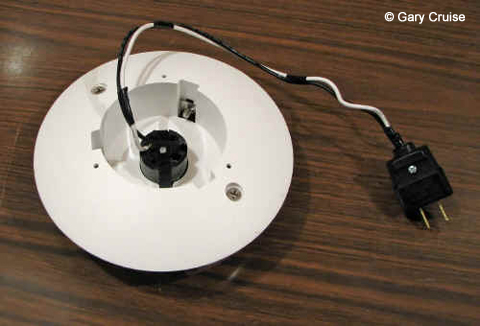
Let’s start by getting the globe fitter ready to attach to the ABS pipe. First step: Attach a standard plug to the globe fitter.
Now you need to attach the ABS coupler to the globe fitter. Remove the three clamp screws from the fitter:
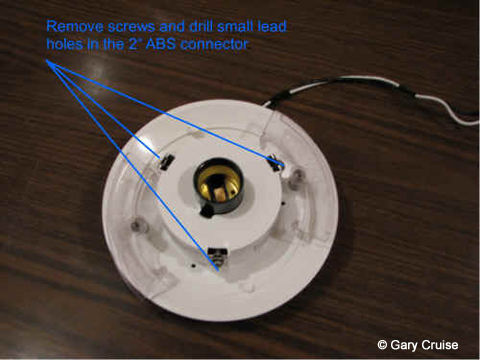
Insert the ABS coupler in the hole on the bottom of the globe fitter (it’s a very loose fit) and drill small lead holes through the holes where you removed the clamp screws.
Use 1 inch screws to attach the coupler to the globe fitter. You have simply swapped the small retaining screws for 1 inch screws which hold the ABS coupler tightly in place.

This piece will now slide on and off the ABS drain pipe which will be your post. This makes it easy to take the lamp apart and move it. Do not use glue!
Now drill a ½ inch hole about a foot from the bottom of the ABS pipe and feed a length of power cord up through the pole. Add a female receptacle to the top end of the cord and a male plug to the bottom.
Plug the fitter into the female receptacle you just added to the top; slide the globe fitter onto your post and install a 25 watt frosted light bulb. Place the globe on the fitter and enjoy your lamp.
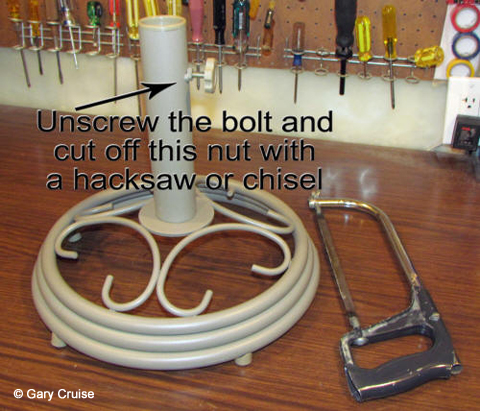
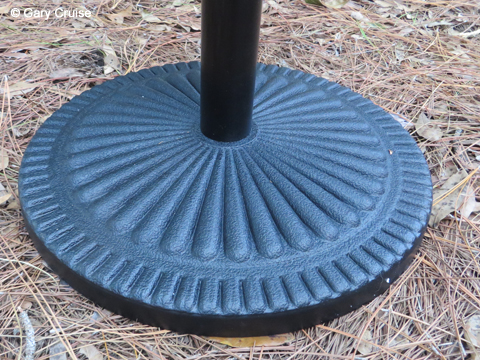
You will need to devise a base for the lamp. I use patio umbrella bases I buy at Wal-Mart or Christmas Tree Shops for about $25.00. You simply use a chisel or hacksaw to knock off the nut which holds the retaining bolt and the ABS post slides over the post on the umbrella base. I paint it black to match the post and secure it with two or more screws.
Be sure that your base is wide enough and heavy enough to prevent your lamp from blowing over. I would not use a base weighing less than 30 pounds! The cast metal or composite umbrella base has worked very well for me. Christmas tree bases, or those plastic umbrella bases you fill with water or sand are not very reliable. If your lamp blows over it will shatter!
Would you like to add a cross-bar to the post? A place to hang a flag, pennant or sign? That’s very easy to do . . . just cut a length of 3/4″ dowel to the length you want and drill a 3/4″ hole through the ABS post. Be very careful to keep the holes exactly even so that your cross-bar will be level. Use a drill press if you can, or measure very carefully!
Slide the dowel through the two holes and add some decorative end caps. I use wooden drawer pulls from Home Depot, the kind you find on the drawers in your kitchen cupboards. Just screw one on each end of the dowel to add the finishing touch to your cross-bar.
Some ingenious folks have used unique things to make a heavy base for their lamps. My favorite so far is an old farmer’s milk can painted in Mickey’s colors, red, black and yellow. It looks great!
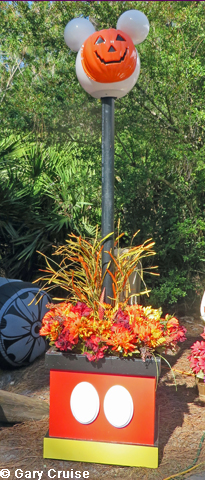
Our friend Al made a pair of decorative Mickey coloured boxes to support his two Mickey lamps. This box represents Mickey, the other has smaller polka-dots and more of them. It holds the Minnie lamp. The boxes are a nice personal touch to make his lamps very elegant and distinctive!
Building your own Mickey lamp is fun but you will soon find that your fun has just begun. Think of the great times you’re going to have decorating Mickey for the seasons!
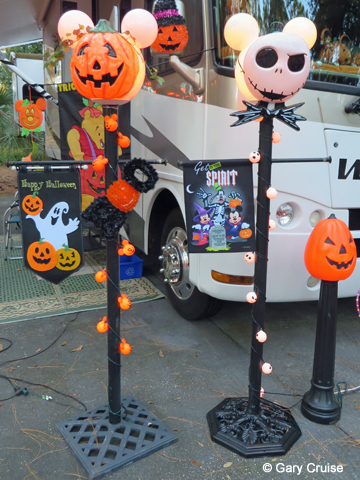
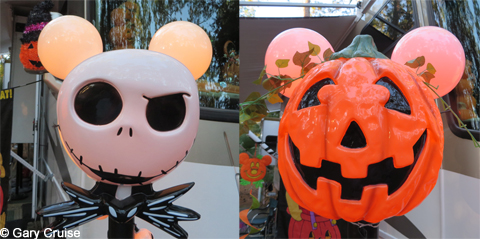
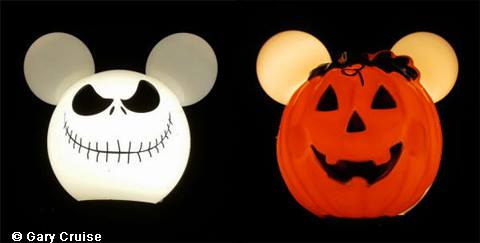
Use different coloured bulbs, use strings of lights, add pennants and banners, masks, hats, ribbons . . .
So what are you waiting for? Get busy building your very own Mickey lamp!


whoo
Actually, I had purchased PVC pipe. I have replaced the 2 inch ID pipe with 1-1/2 inch ID, which is just under 2 inch OD and fits my stand. I found a step up coupler to join the new pipe to the globe fitter. So, all is well.
Thanks,
Steve
[Gary writes: Glad it worked out Steve!]
Gary, my wife bought a good, sturdy umbrella mount that is 2.1 inches in inside diameter with a plastic sleeve to reduce it to 1.5 inches. The ABS pipe I bought is 2 inches inside and 2.38 inches outside, so it fits neither inside nor over the base. Did I buy the wrong pipe? Can I step down to one that fits the stand, or will I have trouble with the globe fitter? Thanks for any advice you can provide.
[Gary writes: Yes, some umbrella bases have a thick post that will not fit inside the 2″ ABS pipe. I’ve always been able to find ones that will fit, but I’ve heard from others who have had trouble.
One person told me that they replaced the post that came with the umbrella base. They used a smaller diameter metal pipe that would fit inside the ABS and bolted it tightly to the base.
See if that could work for you!}
Hi Gary
I don’t see in the instruction where the outdoor lantern pier base is used did I just miss it
You sent me the direction for this lamp a number of years ago
I misplaced them was happy to see your blog thru all ears
I read the directions a number of times but do not see where I use the lantern pier base, but it is shown on your list of materials
We are building this for our son for Christmas so we are under the gun to get it finished
The one we made for ourselves a number of years ago is still going strong on our front porch here in Florida
Thanks for the info
Gail
[Gary writes: Hi Gail. The lantern pier base is a mounting bracket available at Home Depot. It supports a 3″ metal lamp post, the same post the globe fitter was designed to fit. If your lamp is going to be permanently located, use the 3″ metal post and the pier base. If you want it to be portable, use the ABS or PVC pipe and an umbrella base.}
Perfect Instructions, but I am having a difficult time locating the 12″ Globe here in Canada (Southern Ontario near St Catharines). I can’t seem to find it on the Home Depot web-site, nor in store. I find it okay on the U.S web-site, though the shipping would be astronomical. I did find it at a Lighting Store in St Catharines but it’s near $60.00.
I’ve seen a 10″ at IKEA that might potentially work, but I’d rather do this right.
Any other potential locations to get this? Especially as I’m hoping that eventually to have more than one for our Fort Wilderness adventures (first time down there back in September and going again in April!)
[Gary writes: Hi Matthew, I’m in Southern Ontario too and like you I’m quite close to the border. I have never found the 12″ acrylic globes in Canada but when I cross the border they are in almost every Home Depot. I suggest that you head to Lewiston, Niagara Falls or Buffalo. That’s where you’ll find them.]
Gary, thanks for the idea. Made two of these for my wife for Christmas and permanently mounted them outside the front of our house. She loves them by the way. Now we are trying to figure out how we can decorate them for each season. The options are unlimited. Just to let you know I discovered that if you use an led flood light, it lights the head and ears up evenly. I also used an photo eye pole so I don’t have to get up and turn them on every night.
So once again thanks, especially from my wife.
Rob
I guess Disney finally decided to get on the lamppost bandwagon, because I spotted a pre-made one just last week at Lowes in Ottawa, along with other Disney Christmas merchandise!
You mentioned a “Minnie” lamp when describing the box style bases. Please advise on how you decorated the lamp for Minnie.
Thanks in advance. Our whole family is Disney maniacs. Our oldest son is building a new home and I can’t wait to build him a Mickey and Minnie lamp post set for his driveway.
[Gary writes: The boxes our friends made represent Mickey and Minnie. The Mickey box is pictured in the blog. It has two white oval pieces to represent Mickey’s buttons. The Minnie box they created is very similar, but has about a dozen smaller round white pieces to represent Minnie’s polka dots.
To transform the globes into Minnie some people use a bow made of ribbon, attached with double-sided tape and velcro. Use your imagination and have fun, but be sure to avoid any permanent adhesives. They can ruin the globes.]
Well now I know what project to give my retired Electrician husband.
Thanks Gary
Love it! Thanks for the directions. Guess what I’m asking hubby to make me for Christmas … 🙂
This is fabulous, thanks for sharing, definitely going to make these,love it,x