
I recently attended a photo workshop where I saw some fantastic panoramic images. As the presenter went through the steps to create them, I got so excited that when I got home last night I searched through my Walt Disney World photos to see if I had any candidates for a panoramic.
Though I did find some including the example I am showing you today, you really need to create images with the panoramic image in mind. Here’s a list of tips when photographing for panoramics:
1. Use a level tripod. The key here is to make stitching the images together easier for the software. I will tell you the software I tried was very good a finding a way to match up images even if hand held. So, if you are going out to specifically create panoramic photos, then use a tripod. If you are in the middle of a themepark without one, go ahead and hand hold.
2. Use the same exposure for all images. Again, this will make matching up the images easier. Also, another good use of the Manual mode.
3. Make your exposures as fast as possible. This is help keep all your images even and, if you have any moving subjects, it will keep down the movements of those subjects.
4. Avoid using a polarizer filter. If you are trying to capture a wide expanse of sky, a polarizer will cause different hues as the camera is moved from one image to another and the angle to the sun changes.
5. If using a digital camera, turn off Auto White Balance (AWB). AWB can change the color cast of an image as the light changes from one image to another. If it’s cloudy out, use the Cloudy setting. If bright sun, use the Sunny setting, etc.
6. Overlap the Images. For best results, overlap the images about 20% if you are using focal lengths of 35mm and up. If you are using a wide angle lens then increase that to 40 to 50% because wide angles can distort at the edges.
Now, let’s create a panoramic of these two photos I took of a sunset at Epcot’s World Showcase. As you can see they are level as I was using a tripod. They have enough overlap to make the stitching easy for software or to manually match them up if I choose to do so.
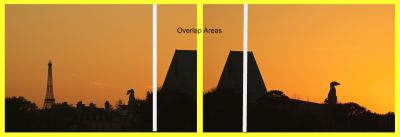
I have my photos selected. I edited them the same and matched up the sky colors as best as I could. Check to see if the software you use to edit photos with has a panoramic tool built-in. The last few versions of Photoshop has it and is called Photomerge. I tried out a few different programs and liked Arcsoft’s Panorama Maker 5 (for PC or Mac) the best. It automatically did the hard work of stitching the photos together and even has virtual framing options available. There are many other programs out there so try them out to see which one is best for you. Here’s the final version after Panorama Maker 5 got done with it’s magic.
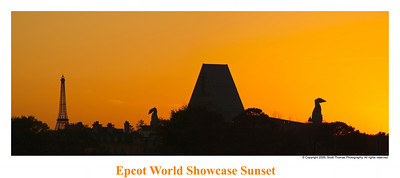
World Showcase Sunset Panoramic
Something to keep in mind. While this is a horizontal panoramic, I saw some vertical ones during the workshop which were gorgeous. I’ll be looking for panoramic opportunities on my next visit to a Disney resort.







We recently tried to get a digital panoramic photo printed. The kiosks in our town (Sony & Kodak versions) didn’t have the option to print panoramic, so when we went out-of-town, we tried kiosks at Walmart. They also were not able to print digital panoramic. We were told they could print panoramic from film, but not digital. We ended up talking to the tech teacher at a local high school, and she was able to print the photo at the school using 11×17 photo paper. Why are the kiosks unable to print this size especially when the photo paper comes on rolls? Why do digital camera have this option if the photos are so hard to get printed? Thanks for your tips!
Lisa replies: Hi Laura,
Scott asked me if I could offer you some advice. Digital cameras usually shoot in Panorama Assist mode, allowing you to take 2 or 3 photos and helping you to lineup the edges on the LCD screen. Then using the software provided at home you can stitch them together and save them as a single JPG.
As for printing, the kiosks aren’t designed to print anything other than 4×6’s, 5×7’s or 8×6’s. They do use rolls of paper but printing a panoramic would be wasteful for these machines. Also, the quality is poor and the print won’t last as long as it would coming from a wet lab.
Try calling a professional camera shop with a mini-lab. I worked for Ritz Camera and we were able to print panos. It wasn’t an option on our kiosks that were hooked up to the lab but you could personally request panoramics and someone from the lab would adjust everything on their end. I think the proper size is 4×8 and larger.
Scott replies: Thank you, Lisa!!!! BTW, Wal-Mart can print panoramics but not sure if I’d trust people not trained in how to use such equipment correctly. I have a local camera shop that does such work who does fantastic work and pricing not much higher than a Wal-Mart or Ritz.